[ 문제 ]
SpringSecurity를 공부하던 중 SpringSecurity를 이해하기 위해선 SecurityFilterChain에 대한 이해가 필수라는 것을 느꼈다.
SecurityFilterChain이 담당하는 인증과 인가는 개발을 하면서 꼭 알아야 하는 부분이며, Filter의 동작 순서만 이해해도 SpringSecurity를 이해하는데 큰 도움이 될 것이다.
어렵고 복잡한 코드보다는 Filter를 이해하기 위한 동작 순서와, 로그인을 할 경우 인증된 사용자의 정보가 어디에 담기는지 살펴보려고 한다.
[ Filter란? ]

- 동작 순서
- 요청 [Request]: Client -> Filter -> DispatcherServlet -> SpringBoot
- 응답 [Response]: SpringBoot -> DispatcherServlet -> Filter -> Client
Filter란 Client로 부터 오는 요청과 응답에 대해 최초/최종 단계의 위치이며 이를 통해 요청과 응답의 정보를 변경하거나 부가적인 기능을 추가할 수 있다.
주로 범용적으로 처리해야 하는 작업들, 예를들어 로깅 및 보안 처리에 활용한다.
Filter를 사용하면 인증, 인가와 관련된 로직을 비즈니스 로직과 분리하여 관리할 수 있다는 장점이 있다.
[ Filter Chain ]

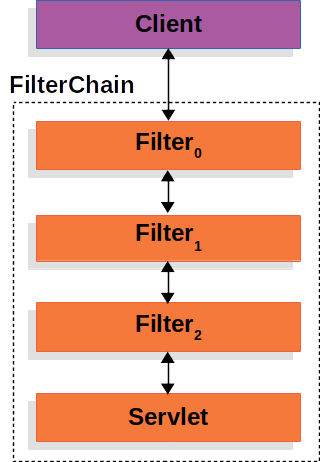
Filter는 한 개만 존재하는 것이 아니라, 이렇게 여러 개의 Filter가 Chain 형식으로 묶여서 FilterChain이라 부른다.
[ SpringSecurity - FilterChain ]
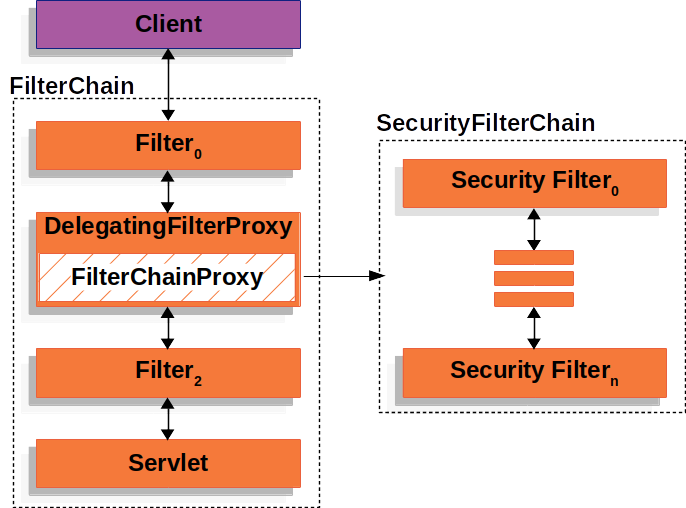
Spring에서 모든 호출은 Filter를 지나 DispatcherServlet을 통과하게 되고, 이후에 DispatcherServlet에 의하여 각 요청을 담당하는 Controller 로 분배된다.
로그인을 하기 위해 Spring에서 Filter를 구현하다 보면, 다음 Filter로 이동하기 위해 FilterChain인터페이스의 메서드인 dofilter()를 호출하게 되는데, 이는 doFilter()를 호출하지 않으면 Controller까지 요청이 도달하지 못하기 때문이다.filterChain.doFilter(request, response); // 다음 Filter 로 이동

Spring Security는 인증 및 인가를 처리하기 위해 Filter를 사용하는데, FilterChainProxy를 통해서 상세 로직을 구현한다.
[ UsernamePasswordAuthenticationFilter ]

- 인증 과정
- 사용자가 로그인을 하기 위해 username과 password를 제출하면 UsernamePasswordAuthenticationFilter는 인증된 사용자의 정보가 담기는 UsernamePasswordAuthenticationToken을 만들어 준다.
- 만들어진 UsernamePasswordAuthenticationToken을 AuthenticationManager에게 넘겨 인증처리를 맡긴다.
- 인증에 실패하면 AuthenticationManager는 SecurityContextHolder를 비워준다.
- 인증에 성공하면 AuthenticationManager는 SecurityContextHolder에 Authentication를 세팅한다.
[ SecurityContextHolder ]

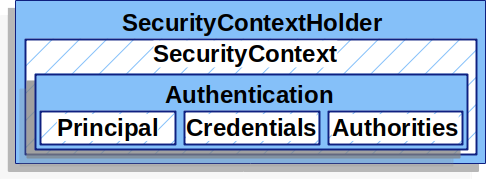
SecurityContextHolder를 통하여 SecurityContext에 접근할 수 있다.
SecurityContext는 인증이 완료된 사용자의 상세 정보를 UserDetails를 통하여 Authentication에 저장한다.
예시 코드// SecurityContextHolder에 SecurityContext만들어준다 SecurityContext context = SecurityContextHolder.createEmptyContext(); // UsernamePasswordAuthenticationToken에 인증된 정보를 인증 객체인 Authentication에 저장한다 Authentication authentication = new UsernamePasswordAuthenticationToken(principal, credentials, authorities); // SecurityContext에 .setAuthentication()를 통하여 인증 객체 Authentication를 저장한다 context.setAuthentication(authentication); // SecurityContextHolder에 .setContext()를 통하여 만들어진 Context를 저장한다 SecurityContextHolder.setContext(context);
[ Authentication & UserDetails ]
- UserDetails
- 검증된 UserDetails는 Authentication을 만들 때 사용되며 해당 인증객체는 SecurityContextHolder에 세팅된다. Custom하여 사용이 가능하다.
- Authentication
- 현재 인증된 사용자를 나타내며 SecurityContext를 통해 가져올 수 있다.
- principal : 사용자를 식별하며, UserDetails 인스턴스이다.
- credentials : 주로 비밀번호를 담으며, 대부분 사용자 인증에서 사용한 후 다시 비워준다.
- authorities : 사용자에게 부여한 권한을 GrantedAuthority로 추상화하여 사용한다.
이로써 우리가 로그인을 시도할 경우 SpringSecurity의 인증과 인가를 처리하기 위해 Filter에서 어떤 방식으로 흐름이 제어되고, 인증된 사용자의 정보를 어디에 담는지 살펴보았습니다.
읽어 주셔서 감사합니다 😊
'해피 코딩 > Spring' 카테고리의 다른 글
| [MSA] API 게이트웨이 Spring Cloud Gateway (0) | 2024.08.05 |
|---|---|
| [MSA] 로드 밸런싱 Ribbon (0) | 2024.08.04 |
| [MSA] 서비스 디스커버리 Eureka (1) | 2024.08.04 |
| [NaverOpenAPI] NaverSearchAPI를 사용하여 쇼핑 상품 검색하기 (0) | 2024.07.19 |
| [Spring] SpringBoot에서 환경 변수 설정하기 (1) | 2024.07.16 |


